Monday, March 31, 2014

holiday cranberry-nut bourbon cake

I have joined The Home Bakers for a few months and although I hadn't always had time to bake with this bunch of talented bakers, led by Joyce from Kitchen Flavours, I always keep up to date with what they are baking because it is always something amazing!


This is my first time hosting a "bake-off" with this group, and I have chosen to bake a Bundt cake. Not just any old Bundt cake, mind you! This is a bourbon infused cake that is packed with cranberries and pecans and it is to die for!!


To make this cake, I started by toasting some pecans for about 5 to 8 minutes at 180C. Nuts tend to burn quite easily, so do keep an eye on them. Toasting nuts bring out their full flavour and make them oh-so-delish. I gave the (cooled) pecans a rough chop and set them aside.


Into a mixing bowl, I added the egg, orange zest, sugar and oil. I beat this on high for a few minutes.


While that happen, the flour, baking powder and baking soda were sifted. Then they were added to the egg mixture, along with the buttermilk, in the sequence, flour-buttermilk-flour-buttermilk-flour.


Until I got a smooth mixture.


It is important to use a spatula to scrape the sides of the bowl once in a while to ensure that everything had been incorporated.


In went the cranberries and pecans.


I gave everything one final mix.


And the batter was transferred into a Bundt pan, and baked.


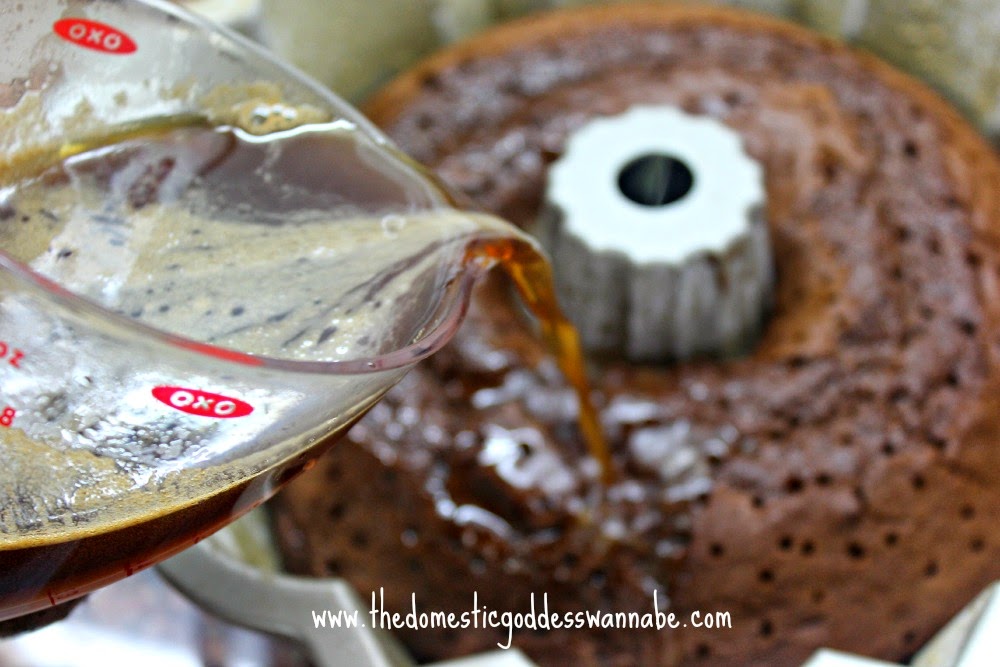
During the last 5 minutes of baking, I made the orange-bourbon syrup by combining them in a bowl.


Using a skewer, I poked holes in the cake, and poured the syrup onto the cake.


I left the cake for at least an hour so it could absorb the syrup.


It is a moist and tender cake, and totally great for those who love a fruit + nuts + booze kind of cake!!

In fact, this reminds me so much of Chirstmas, I will definitely make this for friends and family this coming Christmas!

RECIPE
Holiday Cranberry-nut Bourbon Cake (Serves 12-16)
Adapted from "Coffee Cakes" by Lou Seibert Pippas

NOTE: I halved the recipe and baked the cake in a 5 to 6-cup Bundt pan

Ingredients:
2 large eggs
1 cup granulated sugar - I halved this
2 tablespoons grated orange zest
¼ cup canola oil
2-½ cups unbleached all-purpose flour
1-teaspoon baking powder
1-teaspoon baking soda
1-cup buttermilk
1-cup fresh or frozen cranberries - I used dried cranberries
1 cup chopped pitted dates or golden raisins - I omitted this
1 cup (4 ounces) coarsely chopped toasted pecans
¼ cup freshly squeezed orange juice
¼ cup bourbon or Scotch whiskey - I used Gentleman's Jacks
Confectioners sugar for dusting - I omitted this

Method:
1. Preheat the oven to 170C (350˚F). Butter and flour a 9-inch Bundt or tube pan.
2. In a large bowl, mix the eggs, granulated sugar, orange zest, and oil with a wooden spoon or an electric mixer until blended.
3. In a medium bowl, combine the flour, baking powder, and baking soda. Stir to blend. Gradually add the dry ingredients to the egg mixture alternately with the buttermilk in 2 increments. Mix just until blended. Fold in the cranberries, dates or raisins, and pecans. Pour the batter into the prepared pan, smoothing the top evenly.
4. Bake for 35 minutes, or until the cake is golden brown and a cake tester inserted in the center comes out with very few crumbs.
5. Place the pan on a wire rack. Combine the orange juice and bourbon or Scotch and pour evenly over the hot cake. Let the cake cool in the pan for 10 to 15 minutes (I left my cake to absorb the syrup for an hour), then carefully unmold right side up on a wire rack. Let cool completely. Dust with confectioners sugar and cut into slices to serve.

Do check out my fellow bakers' interpretation of this gorgeous cake by clicking on the badge below!


Friday, March 28, 2014

no-bake nutella cheesecake

Being a little weird different, I don't eat a lot of chocolate. Having said that, it doesn't mean I don't like chocolate. It's just that I rarely crave for it.


The one chocolate-y thing I do like quite a lot is Nutella. I think it is one of those things leftover from my childhood. One of those times when eating something reminds you of the time when you were just a kid, and when life was a lot less complicated.

Although I am not a big dessert-person, I seem to always have digestive biscuits and cream cheese at home. So you get the drift. Yep, if I do want to eat cake, my #1 choice would always be a cheesecake.


Today, craving for a little Nutella and a slice of cheesecake, I decided to combine the two and make a Nutella cheesecake.

To make a cheesecake, one always starts with making the base since it needs time to chill. So, into a food processor, I added the digestive biscuits. I blitzed this using the pulse button.


I added the softened butter and blitzed until combined.


Then I added almond meal since I didn't have hazelnut meal. And blitzed some more.


Finally, the Nutella was added and blitzed as well.


This was poured into the base of a lined and lightly greased Springform pan.


And pressed down.


This was then placed in the fridge to chill while I got on with the filling.

To make the filling, I first blitzed together cream cheese and icing sugar until it was smooth.


I added the remaining Nutella, and continued blitzing.


I scrapped the side of the bowl a few times to get an even mixture.


This was poured onto the chilled base. Using a spatula, I smoothed the top.


And sprinkled almond meal on top.


I covered the pan with cling film and placed this in the fridge to chill, preferably over-night.


I am sure that it would have been better if I had hazelnuts.


But you know, I still finished the entire slice!

RECIPE
No-Bake Nutella Cheesecake (Serves 8-10)
Adapted from Nigella Lawson

Ingredients:
250g digestive biscuits
75g soft unsalted butter
400g Nutella (at room temperature)
100g chopped toasted hazelnuts - I used almond meal
500g cream cheese (at room temperature)
60g icing sugar, sifted

Method:
1. Break the digestives into the bowl of a processor, add the butter and a 15ml tablespoon of Nutella, and blitz until it starts to clump. Add 25g/3 tablespoons of the hazelnuts and continue to pulse until you have a damp, sandy mixture.
2. Tip into a 23cm/9inch round Springform and press into the base either using your hands or the back of a spoon. Place in the fridge to chill.
3. Beat the cream cheese and icing sugar until smooth and then add the remaining Nutella to the cream cheese mixture, and continue beating until combined.
4. Take the Springform out of the fridge and carefully smooth the Nutella mixture over the base. Scatter the remaining chopped hazelnuts on top to cover and place the tin in the fridge for at least four hours or overnight. Serve straight from the fridge for best results.

This post is linked to Cook like a Star, ALL Stars Anniversary organised by Zoe from Bake for Happy Kids, Joyce from Kitchen Flavours and Mich from Piece of Cake


Thursday, March 27, 2014

kimchi jjigae - kimchi stew

I was in the mood for Korean food, so I went to a Korean food specialist store and bought a packet of kimchi to make kimchi stew.


I am not a huge fan of kimchi. When I say this, I mean that I am not overly crazy about the kimchi that is usually served as a side dish at a Korean meal. I find them too sour and too one-dimensional in taste.

But when kimchi is made into a stew, I go absolutely mental over it. I have no idea if this is because different types of kimchi are used, or because cooking mellows the flavour of the kimchi, but I can eat bowls of this.


Kimchi stew is really easy to make. There are easy versions in which one simply adds the kimchi and kimchi juice to water, bring to a boil, add seasonings and one can enjoy kimchi soup.

For me, I prefer to spend a bit more time and effort to make an already flavourful soup base by boiling together seaweed, anchovies and dried shitake mushrooms for 20 minutes, and then straining the stock.


I think by doing this extra step, the stew tastes so much better.

I sliced the re-hydrated shitake mushrooms and set them aside. In addition, I completed my prep by cutting off the roots of Enoki mushrooms and cubing some toufu.

I also sliced some kimchi. It pays to buy a good kimchi for this.


Into the stock, I added the kimchi, mushrooms and sliced beef.


I also added the kimchi juice and Korean chili powder, salt, black pepper, minced garlic, Korean sesame oil and finally, the toufu. You need to taste as you season in order to get a right balance of everything.


Once the stew has come to a boil, I added the spring onion, and turned off the heat.


And a comforting bowl of stew is ready to be eaten.


Hmmmmm. :)

RECIPE
Kimchi Jjigae - Kimchi Stew (Serves 4-6)

Ingredients:
500g kimchi, cut into bite sized pieces
300g beef (or pork), sliced
400g soft toufu, diced
6 pieces shitake mushroom (from making the stock), stems removed and sliced
1 packet Endoki mushrooms, roots removed
2 cloves garlic, minced
1 sprig spring onion, cut
2-3 teaspoons kimchi juice
2-4 teaspoons Korean chili powder
1 teaspoon Korean sesame oil
1/2 teaspoon salt
1/2 teaspoon ground black pepper

For the stock:
15 anchovies, heads and guts removed
1 small handful of seaweed
6 pieces dried shitake mushrooms
1.5 litre of water (more if necessary)

Method:
1. Make stock by boiling anchovies, mushrooms and seaweed in the water for 20 minutes. Turn off hear and strain, reserving the stock and mushrooms. Slice mushrooms and set aside.
2. Add kimchi, mushrooms and beef to stock. Add kimchi juice, Korean chili powder, salt, black pepper, minced garlic and sesame oil. Finally, add toufu and stir to mix.
3. Once the stew comes to a boil, add spring onion. Turn off heat and serve hot, with rice, if desired.

I am sharing this post with

MummyMoo

Wednesday, March 26, 2014

espresso cake with hot kahlua syrup

This month at The Cake Slice Bakers, we are baking an espresso cake.


I am not a big coffee drinker. I will have an iced latte once in a while, but I am not one of those people who need a cup of coffee first thing in the morning.


This was also the first time I used Kahlua to make a cake, or to be more accurate, the syrup for the cake. This was great because all I had ever used Kahlua for was to make Tiramisu. It is always interesting to use an ingredient in a different way. :)

To make the cake, I first greased and floured a 10-cup Bundt pan. You can also halve the recipe and bake the cake in a smaller Bundt pan, or a 9x5-inch loaf pan.

In a mixing bowl, I creamed together butter and lemon zest. To this, I added caster sugar, a tablespoon at a time, until the mixture turned light and fluffy.


To this, I added the eggs, one at a time, and mixed.


Then I added the sour cream and vanilla extract. You should get a smooth mixture at the end of this.


I added the flour/ baking soda/ salt/ cocoa powder mixture and the coffee mixture in the sequence flour-coffee-flour-coffee-flour.


Finally, I gave the sides of the bowl and the paddle a good scrape.


And transferred the batter into the Bundt pan.


This was baked for about 50-60 minutes.

In the meantime, I made the syrup by combining Kahlua, water and honey in a small pot. This was placed over low heat and brought to a gentle boil. Then it was left to simmer for a few minutes before being removed from the stove.


When done, the cake was left  to cool slightly on a wire rack before I used a skewer to pierce holes all over it and then poured the syrup onto the cake.


The cake was left in the pan for at least an hour so it could absorb the syrup.


Then I (very carefully) inverted the pan and transferred the cake onto a cooling rack.


This is definitely a cake for adults.


I think it is nice to make something for the grown-ups once in a while. :)

RECIPE
Espresso Cake with Hot Kahlua Syrup (Serves 12-16)
Adapted from Great Cakes by Carole Walter

Ingredients:
For the Cake:
3 tablespoons instant espresso
¼ cup boiling water
¼ cup cold water
2¼ cups sifted cake flour
1 tablespoon unsweetened cocoa powder
1 teaspoon baking soda
½ teaspoon salt
½ cup (1 stick, 113g) butter
½ teaspoon freshly grated
lemon zest
1½ cups superfine or strained sugar
3 large eggs
1 teaspoon vanilla extract
½ cup sour cream

For the Kahlua syrup:
⅔ cup Kahlua or Tia Maria liqueur
⅓ cup water
3 tablespoons honey

Method:
For the Cake:
Position rack in lower third of the oven and preheat to 350℉.
Spray a 10-cup bundt pan with baking spray.
In a small bowl, dissolve the espresso in boiling water. Stir in the cold water and set aside to cool.
Using a triple sifter, sift together the flour, cocoa, baking soda, and salt. [If you do not have a triple sifter, sift the dry ingredients together three times.] Set aside.
Cut the butter into 1-inch pieces and put them and the lemon rind [zest] in the large bowl of an electric mixer fitted with beaters of paddle attachment. Soften on low speed, then increase speed to medium-high and cream until smooth and light in color, about 1½ to 2 minutes.
Add the sugar, 1 tablespoon at a time, taking about 6 to 8 minutes to blend it in well. Scrape the sides of the bowl occasionally.
Add the eggs, 1 at a time a 1-minute intervals. Blend in the vanilla and sour cream. The mixture will look somewhat curdled at this point. This is okay.
Reduce mixer speed to medium-low. Add the dry ingredients alternating with the espresso, dividing the dry ingredients into three parts and the espresso into two parts, starting and ending with the flour. Mix just until incorporated after each addition. Scrape the sides of the bowl and mix for 10 seconds longer.
Pour the batter into the prepared pan and smooth the surface with the back of a tablespoon. Center the pan on the rack and bake in the preheated oven for 55 to 65 minutes, or until the cake begins to come away from the sides of the pan and a twig of straw or a toothpick inserted into the center comes out dry.
Remove from the oven. Set the pan on a cake rack for 10 to 15 minutes to cool slightly.

For the Kahlua syrup:
In a small saucepan blend the Kahlua, water, and honey. Bring to a slow boil and simmer 2 to 3
minutes. Remove from heat.
Pierce the top of the cake with a wooden skewer and slowly spoon the hot syrup over the top of the hot cake.
Let stand in the pan for at least 1 hour to allow cake to absorb all the liqueur, then invert onto a rack and remove pan.
Store at room temperature under a glass dome or in an airtight container for up to 7 days.


To see what my friends at the Cake Slice Bakers have baked this month, click on their links below!