Thursday, June 27, 2013

three cup chicken (三杯鸡)

I cannot say that I cook a lot of Taiwanese dishes. In fact, I think my repertoire of Chinese dishes is rather limited to what my mom has cooked, which means very typical Singaporean Chinese food.

I have heard of Three Cups Chicken ages ago, but I have never really tried cooking it.
Yesterday, I had a cooking "block". The freezer was nearly bare, and I had a pack of cut chicken taken out to be defrosted. I was thinking of cooking either Sesame Oil Chicken, or Soy Sauce Chicken. *YAWN*

Then my sister came to pick me up to run some errands and she mentioned she wanted to borrow my claypot to cook Three Cups Chicken. I asked her to list the ingredients she would need, and since I had most of the ingredients, I thought, why not?
Hence, my very first attempt at cooking this dish. :)

In a heated wok, add the sesame oil. Once the oil is hot, add the ginger and saute until fragrant. Add the minced garlic, and fry for about a minute or so.
Add the chicken.
Stir the chicken around the wok for a few minutes before adding the light soy sauce, Shaoxing wine and ground white pepper.
Add dried chili and rock sugar.
Cover the wok with a lid, reduce the heat to medium and let the chicken simmer for about 20 minutes.
Be sure to give the chicken an occasional stir.

Once the chicken is cooked through, add spring onion and Thai basil leaves.
Turn off the heat, and the residual heat will wilt the basil leaves and spring onion.

Serve hot, with rice.
I was extremely pleased with the results. It looks like this dish will be appearing pretty soon again on my dining table!

RECIPE
Three Cups Chicken (Serves 4)

Ingredients:
1 kg chicken (cut into smaller pieces) or chicken parts
5cm piece of ginger, peeled and cut into pieces
10 cloves garlic, minced
4 tablespoons dark sesame oil
3 tablespoons light soy sauce
3 tablespoons Shaoxing wine (more if you prefer more sauce)
10 pieces dried chili
2 tablespoon rock sugar
1/2 bunch spring onion, cut into chunks
1 bunch Thai basil leaves
1 teaspoon ground white pepper

Method:
1. In a heated wok, add the sesame oil. Once the oil is hot, add the ginger and saute until fragrant. Add the minced garlic, and fry for about a minute or so.
2. Add the chicken. Stir the chicken around the wok for a few minutes before adding the light soy sauce, Shaoxing wine and ground white pepper.
3. Add dried chili and rock sugar.
4. Cover the wok with a lid, reduce the heat to medium and let the chicken simmer for about 20 minutes.
5. Be sure to give the chicken an occasional stir.
6. Once the chicken is cooked through, add spring onion and Thai basil leaves.
7. Turn off the heat, and the residual heat will wilt the basil leaves and spring onion.
8. Serve hot, with rice.


Wednesday, June 26, 2013

pan-fried white fish with lemon sauce

For dinner last night, I made pan fried fish fillet. This is a great way to cook fish - you get flavour without the fish being overly oily.

This is a really versatile recipe as you can use any combination of herbs that you like.

It also gave me the chance to use the Spanish smoked paprika that I love. Smoked paprika gives the dish a depth of flavour that cannot be achieved by regular paprika.


In a bowl, I combined the flour (I used plain flour), smoked paprika, salt, coarsely grounded pepper, the zest of a lemon and dried dill. I like the good old combination of fish and dill.


Using a whisk I mixed the spices, herb and flour.The mixture was placed on a plate and set aside.


I used sutchi fillets because I happened to have them in the freezer.


The fillets were dried as best as possible with some kitchen towels and dredged in the flour/spice/herb mixture.


In a heated pan, I drizzled some extra virgin olive oil and into the oil, I added a knob of butter. The olive oil will help to protect the butter from burning.


The fillets were placed in the oil and fried until the edges turned brown. Fish fillets are rather delicate so resist the urge to poke at the fish - leave it well alone until the edges turn brown!


Once both sides have browned, I drained the fillets on kitchen towel, and poured the juice of one lemon into the remaining oil. The juice would sizzle, and form a quick sauce with the butter and I drizzled some of this sauce of the fish to serve.


I served my fish with roasted potatoes, but that is a post for another day!

RECIPE
Pan-Fried White Fish (Serves 4)
Adapted from recipe by Chef Michael Smith

Ingredients:
1 cup whole wheat or any flour
sprinkle or two sea salt and freshly ground pepper
1 tbsp paprika
1 tbsp any dried herb or spice
1 zest and juice of a lemon
4 - 6 (2 pounds) white fish fillets
large splash vegetable oil
2 tablespoons Butter

Method:
Preheat your largest, heaviest sauté pan or skillet over medium-high heat. A heavier pan will distribute the heat more evenly than a thin one.

Whisk together the flour, salt and pepper, paprika, herb and lemon zest.

Pour the seasoned flour into a shallow dish large enough to hold 1 or 2 fish fillets. Depending on the size of the fillets, and your guests’ inclination to share, cut the fish into individual portions or leave whole.
Dredge fillet pieces in the seasoned flour until they are evenly coated. Rest on a pan or plate but don’t stack them on top of one another.

Pour a large splash of vegetable oil into the pan, enough to cover the pan’s bottom in a thin film. Add the butter to the centre of the oil. The oil will protect the delicate butter from burning, and the butter will add lots of brown flavour. When the butter begins to brown and sizzle, swirl it around the pan and quickly add the fish fillets. Turn up the heat, adjusting it as needed to keep the pan sizzling hot.

Cook the fish in batches so they will all brown evenly. Cook the first side of the fillets for a few minutes until they’re golden brown and beautiful. Carefully flip them and continue with the other side. You may find it useful to add a bit more butter after you flip the fish over.
Continue until the fish cooks through. Add the lemon juice and swirl the pan. It will sizzle, form a quick sauce with the butter and coat each fillet. Serve immediately.


Tuesday, June 25, 2013

vanilla cupcakes with vanilla icing

There are days when I want to bake something but I do not want to deal with chocolate, or fruit, or nuts or anything fancy.

On days like that, I go back to the basics, and basics to me spells V-A-N-I-L-L-A.


Today, I am sharing my take on vanilla cupcakes. I have tried many recipes, but this recipe from Primrose Bakery remains one of my favourites because it is (1) a fuss-free recipe, (2) it is not overly anything, hence it is a great canvas for piling on different flavoured buttercreams, and (3) it is a delicious cake in its own right.
 

Primrose Bakery was founded by Martha Swift and Lisa Thomas, in 2004, who started out by baking cakes for children's parties. Nine years down the road, they have two shops, two cookbooks and another on its way. How awesome is that? :)

For the vanilla cupcakes, I started by creaming the butter and sugar until the mixture was light and fluffy.


Then I added the eggs, one at a time, and ensuring that the first was thoroughly incorporated before adding the second egg, and mixing that well into the batter too. After that, I added the vanilla extract and beat that into the batter.


The resulting batter should be smooth.


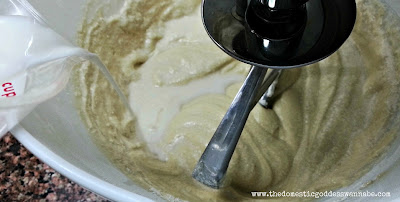
The sifted flours and milk were then added in the sequence: flour-milk-flour-milk-flour.


Until they were completely incorporated.


The batter was spooned into the cupcake cases, filling each case until about two-thirds full.


Then they were baked until they were slightly raised and golden brown. A skewer inserted into the cake should emerge clean.


The cupcakes were allowed to cool n the baking tray for about 10 minutes before being transferred to a cooling rack to cool completely.

To make the vanilla buttercream icing, I beat the butter, milk, vanilla extract and half the icing sugar until the mixture was smooth.

Then the remaining icing sugar was added and beaten until the buttercream was both smooth and creamy.

If the buttercream is too thin or runny, add a little more icing sugar and beat until you achieve the desired consistency. If it is too thick, add a little more milk and beat.


I wanted a pale pink, so I added one drop of pink. If you want a darker colour, add one drop at a time and beat to mix before you add the next drop. You can add, but you cannot take away, so go slow.


Once the cupcakes were cool, I slathered on the icing, and decorated them with sprinkles immediately.

The cupcakes were stored in the fridge, and taken out for 15 minutes (so they get to room temperature) before I was ready to serve them.


RECIPE
Vanilla Cupcakes (Makes about 12 regular or 36 mini cupcakes)
Adapted from recipe from Primrose Bakery

Ingredients:
110g (4oz) unsalted butter, at room temperature
225g (8oz) caster sugar, preferably golden 
2 large eggs, free-range or organic 
150g (5½oz) self-raising flour, sifted 
125g (4½oz) plain flour, sifted 
120ml (4fl oz) semi-skimmed milk, at room temperature 
1tsp good-quality vanilla extract

Method:
Preheat the oven to 180C/160C (fan)/gas 4 and line a 12-hole muffin tray or 3 x 12-hole mini muffin trays with cupcake cases. 
In a large mixing bowl, cream the butter and sugar until the mixture is pale and smooth. Add the eggs, one at a time, mixing for a few minutes after each addition. 
In a separate bowl, combine the two flours. Put the milk into a jug and add the vanilla extract. Add one third of the flour to the creamed mixture and beat well. Pour in one third of the milk and beat again. Repeat these steps until all the flour and milk have been added. 
Spoon the mixture into the cupcake cases, filling them to about two thirds full. Bake in the oven for about 25 minutes (regular size) or 15 minutes (mini size) until slightly raised and golden brown. To check they are cooked, insert a skewer in the centre of one of the cakes  -  it should come out clean. 
Remove from the oven and leave on a wire rack to cool.

Vanilla Buttercream Icing (Makes enough to ice 15-20 regular cupcakes or about 60 mini cupcakes)

Ingredients:
110g (4oz) unsalted butter, at room temperature
60ml (2fl oz) semi-skimmed milk, at room temperature
1tsp good-quality vanilla extract 
500g (18fl oz) icing sugar, sifted 
Few drops of food colouring (optional)

Method:
In a large mixing bowl, beat the butter, milk, vanilla extract and half the icing sugar until smooth. Gradually add the remainder of the icing sugar and beat until the buttercream is smooth and creamy. 
If you want to colour your buttercream, always start with one drop of colouring and beat. This will be all you need to achieve a very pale pastel hue. Add carefully, drop by drop, and beat after each addition to build up to your desired shade.


Monday, June 24, 2013

dave and kate's chocolate brownie

We were really busy over the weekend - our little girl is turning one this week and we held a birthday party for her on Saturday evening.

The party almost looked like it was not going to happen with the PSI going up to 400. We were really fortunate as the haze cleared on Saturday morning, and we could have the party as planned.

Cake baked by my wonderful cousin!

Decorated the function room.

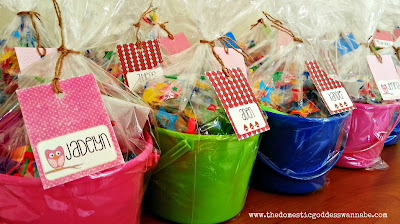
Party favors for the kiddos. 

Our little pride and joy!

Since Sunday was a relatively quiet day, I thought I would bake something simple. Something that would go down well with my (sort of) reflective and (a little) pensive mood.

Something that would not involve a ton of washing up. Something I could mix by hand. Well, with a hand whisk anyway.

I guess a brownie was the answer.


There are gazillion brownie recipes online. What is the perfect brownie for one could be someone else's worst nightmare.

To start with, I am not a cake/brownie/cookie/ anything-that-is-sweet fan. (Yes, I know you have heard that one before). Added to that, I detest all nuts and dried fruit.

So when I bake a brownie, it has to be a "naked" brownie. For that reason, I use only the best chocolate since there really is nothing but the intense flavour of good chocolate here.

To start, I melted the butter and the chocolate in a metal (or glass) bowl over a pot of simmering water. This was done very slowly because I did not want any water to come into contact with the chocolate.


Once the chocolate and butter had melted, the bowl was taken off heat and I added the sugar.


Using a hand whisk, I whisked the sugar into the melted butter-chocolate mixture.

You would end up with a grainy mixture.


Which is all-okay.

Once the eggs and vanilla extract had been added and whisked into the mixture, it became smooth.


The flour was added, and folded into the mixture.


Once the flour had been incorporated (do not over mix), the batter was scrapped into the lined baking tray. If you are adding nuts, add them before you add the flour.

I used an 8-inch square pan. If you prefer your brownie to be thicker, use a smaller baking tray.


The brownie was baked for about 25-30 minutes or until it felt set in the centre.

Once cooled, I lifted the brownie out of the pan and cut it into squares.


The texture of this brownie is somewhere in between cakey and chewy.

The flavour is very intense. I was only able to eat one or two squares at a time.


With a glass of cold, cold milk. :)

RECIPE
Dave and Kate's Chocolate Brownies (Makes 16 small squares)
Adapted from recipe by David Labovitz

Ingredients:
8 tablespoons (115 g) unsalted butter, cubed
2 ounces (60 g) unsweetened chocolate, chopped.
1 cup (200 g) sugar
2 large eggs, at room temperature
1/2 teaspoon vanilla extract
3/4 cup (75 g) nuts, chopped
optional: 1/4 cup (25 g) roasted cocoa nibs
1/4 cup (35 g) flour
1/4 teaspoon salt

Method:
1. Preheat the oven to 325ºF (160ºC.) Line an 8-inch (20 cm) square pan with a large rectangle of foil, leaving the overhang over the rim of the pan. Butter or spray the inside of the foil lining the pan with nonstick spray.
2. In a medium saucepan set over very low heat, melt the butter and the chocolate, stirring frequently, until the chocolate is melted and smooth. Remove from heat and stir in the sugar, then mix in the eggs and the vanilla extract.
3. Stir in the nuts and cocoa nibs, if using, then the flour and salt. Scrape the mixture in the prepared pan and bake for 30 minutes, or until the brownies feel just-set in the center. Remove from oven and let cool. Once cool, lift the brownies out of the pan by grasping the foil overhang, the cut the brownies into squares.


Friday, June 21, 2013

double chocolate chip cookies

I am always on the search for the perfect cookie recipe.

I guess this *perfect* recipe is about as elusive as the perfect handbag that I am forever in search of too.


And I know I have already posted a cookie recipe late last week, but hey, who is counting, right?

Plus, this is a post for Friday, and I always try to post something chocolatey on Fridays. I think it has something to do with ending the (blog) week on a high note, since I do not post on the weekends.

Anyway, I am going to gush about this cookie recipe. If you like chewy cookies with crispy edges, and you like to have a (almost) chocolate-overload, then this is the *perfect* recipe for you.

I ate an entire cookie off the tray - forget about waiting for it to cool - and resisted the temptation to eat more. And if you are a follower of my blog (and so you should be, *wink*), you would know that I am no fan of cookies. For me to post a cookie recipe, it has to score a pretty good grade!

The recipe started with the creaming of the butter and sugar until the mixture became pale and fluffy.


While that was happening, I sifted the dry ingredients into a bowl.


Once the butter and sugar mixture was ready, I added an egg, and continued to beat until the egg was incorporated.


Then the dry ingredients were added in 3 parts.


Until they were thoroughly combined with the butter-sugar-egg mixture.

Some folks I have talked to have mentioned that baking is scary. Baking is not scary. Sure, there are always chances that something might go wrong, but the basic method is usually the same.

I scrapped the mixing bowl, and added the chocolate chips.


There are two types of chocolate chips. One (like the ones I have used here) are flatter and wider, like buttons. They tend to melt when baked, so you would end up with (sort of) gooey chucks of chocolate in the cookies.


The other type of chocolate chips are smaller, and look like little tear drops. They hold their shapes, so you will have tiny chips in your cookies.

So, depending on your preference, you can use either type.

Using the pulse button on my mixer, I pulsed about 3-4 times to incorporate the chocolate chips.


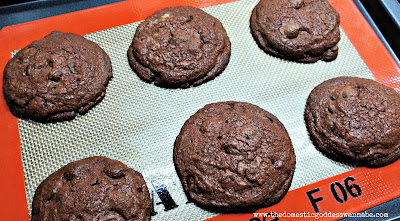
Then I used an ice cream scoop to place the dough on the baking sheets, and baked the cookies for 17 minutes. If you want cookies that are more crispy, flatten the cookies slightly before you bake them, and bake them for up to 20 minutes.


What you would end up with will be so worth the time and effort you have put in. You will not want to buy store-bought cookies ever again.


RECIPE
Double Chocolate Chip Cookies (Makes 12)

Ingredients:
113g unsalted butter, at room temperature
3/4 cup sugar
1 egg
1/4 cup cocoa powder
1 1/8 cups plain flour, sifted
1/8 tsp coarse salt
1/2 tsp baking powder, sifted
1 1/4 cups semi-sweet chocolate chips

Method:
1. Beat butter and sugar in a mixer until mixture turns light and fluffy.
2. Sifted and combine dry ingredients.
3. Add egg to butter-sugar mixture. Beat to thoroughly combine.
4. Add dry ingredients in 3 parts, until batter comes together.
5. Fold in chocolate chips.
6. Chill in fridge for 30 minutes.
7. Using a spoon or ice cream scoop, place dough on lined baking trays.
8. Bake at 170C for 16-20 minutes.
9. Cool before storing in an airtight container.


We are the DinoFamily